How to clear and reset Office 2016 cache: After creating Office or separate files, the common exercise before you is to save it. But when you save the Office 16 file, it generates a copy and accumulates in the Office cache folder before being uploaded to the web server. The cache should be cleared especially when you encounter an error note while trying to upload it to the server. Other than that, after a while the Cache folder gets full and rebooting is a good practice.
It is common practice for all of us to save the created file using Office, for example Excel, Word or PowerPoint. It’s a different case with the new Microsoft Office 16. Every time you save a file with Office 16, it saves and generates a copy of it, which it stores in the cache folder before uploading it to the web server. Cache is everything that contains files that have been accessed frequently and recently for easy access.
Whenever you create a file in Microsoft Word, PowerPoint, Excel, or any of these types of Microsoft Office applications. Along with this, it also generates a copy of the file in the cache folder that can be used to speed up Microsoft Office. This backup file can also be used as a recovery file if your main file is damaged. The cache clearing process can solve many problems that occur in Microsoft Office. So, if you see any unusual behavior in MS Office, first clear your desktop cache.
Why this cache reset?
The problem occurs whenever the cache becomes overloaded as it fills up. This will require it to be reset after erasing. Also, whenever you try to upload a file to the web server and an error occurs, the cache should be completely cleaned. Another event where you would find a way to remove it is when you need privacy notes and want to work directly with the web server.
Another scenario is that you choose to work directly with the server or you are concerned about your privacy and therefore end up deciding to clear the cache. So if you are stuck with any of these or other reasons to clear cache, then continue with the following steps:
Resetting Office 2016 Cache Steps:
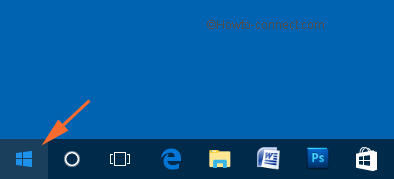
- The main effort for you is to implement the Start menu and then click the Windows icon on the taskbar.
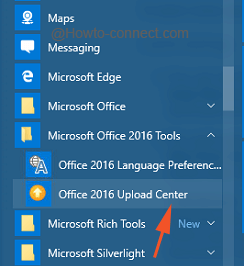
- Go through all the alphabets and stop when you see “M” and look for the Microsoft Office Tools 2016 details. Under the previously selected entry, you can see two more items, choose Office 2016 Upload Center.
- The original interface will render your header as a download center containing buttons at the top, tap Settings.
- The window that will appear will be Microsoft Office Upload Center Settings with two different sections, note the cache settings.
- If you are concerned about your privacy, please check the square box that describes itself as Delete files from Office document cache when closed, as this will immediately clear documents from the cache when closed.
Note: How to Clear and Reset Office 2016 Cache; After choosing this setting when you decide to close a file before the download is complete, you will have to wait for the download to complete. Another way to store the file in a different location.
- Now, to clear the cache of Office documents, tap on the Clear Cache Files button. In addition, the upload center allows you to choose the number of days until you want to delete the Office 16 cache. This is a schedule and when the specified time period ends, the cache files will be deleted.
- The best thing is that Office 2016 is a big step forward in cache mining technique. Securing Office 2016 cache in Windows 10 is very easy and the same is simple to clear cache document content. Depending on your considerations, you can follow the steps above to reset the Office 2016 cache.
Repair Office Document Cache
How to Clear and Reset Office 2016 Cache; If the cache file is corrupted, your file will appear to be stuck in the Office Upload Center. You’ll see an alert in the status bar that Microsoft Office Document Cache has encountered a problem, with a link to fix it. When you click to repair, the download center generates another error message and offers to back up your cache and create a new one for you.
You may also see errors associated with the other cloud app you were using. When you click Fix on the download center error message, it fails again. To resolve this issue, try manually deleting the Microsoft Office document cache. Clearing the cache is not dangerous and can solve the sync issue. After deleting the cache, syncing may happen automatically or you may need to sync manually.
Here is an overview of the Microsoft Office document cache deletion process:
- Perform a clean boot – This step is necessary to ensure that cache files are not loaded at startup. If they did, they would be locked and you would not be able to remove them.
- Delete cache files – This step often resolves the issue. Office usually repairs document cache files if it detects problems. If the cache files are damaged beyond repair, deleting them can cause Office to automatically repair itself by replacing the damaged files.
- Restart and sync: This step is when Office repairs the cache.
Note: If the steps in this article don’t resolve the issue, you might need to uninstall and reinstall Office. The steps for this process are not provided here. For help reinstalling Office, see Install Office on your PC or Mac. If you’re not the person responsible for maintaining the computers at your workplace. We recommend that you contact your system administrator before reinstalling Office. Some special circumstances may affect the installation process.
Delete Cache Files
In Windows 10, click the Windows button, type Microsoft Upload Center in the search box, then double-click the Microsoft Upload Center app in the search results (may say 2010 or 2013, depending on your Office version). In the search box. Then double-click the Microsoft Upload Center app in the search results. Search (may say 2010 or 2013, depending on your version of Office).
Reboot and Synce
This is where you will find out if the issue is resolved. If document cache file corruption was the reason Office was unable to repair the document cache. The issue should be resolved once Office is able to complete the repair and your cloud files are able to synchronize.
Reboot normally. Reboot steps are also provided in the How To Clean Boot in Windows support article. Find your version of Windows in this section and follow the appropriate steps. Resynchronization will occur automatically.
If you use Office RT
The offline part mentioned above won’t work for Office RT, but there is a workaround. In Office RT, the Office Document Cache is not proactive in downloading your Office files from a OneDrive or SharePoint site. It will only cache files that you have opened with an Office application (such as Word, Excel, or PowerPoint). To access cached Office files, open the Office Upload Center and select All Cached Files from the dropdown next to the Refresh button. It will display a list of files in your cache that you can double-click to open, even offline.
You can also open the Office app where you last edited the file and select it from the recently used list. Again, this can be done online or offline.
Office Document Cache settings
How to Clear and Reset Office 2016 Cache; The Microsoft Office Upload Center uses the Office Document Cache. To let you see the status of files you upload to a server, track the progress of uploads, and whether any files need your attention.
You can set the maximum number of days to retain files in the Office Document Cache. Moreover by adjusting the number of days to retain files in the Office Document Cache as needed.
Keeping files longer allows more files to be cached and improves file open performance. Hence it also uses more hard drive space.
Office Reset
Office-Reset is a free downloadable tool that you can use to troubleshoot problems and errors with Microsoft Office applications for Mac. This includes Word, Excel, PowerPoint, Outlook, OneNote, OneDrive, Teams, and AutoUpdate. The tool can help fix application launch errors, freezes, freezes, crashes, bad plugins, corrupt models, performance issues, and confusing error messages.
You can tell Office-Reset to repair a specific app, or you tell it to perform a “factory reset”. Which essentially puts Office back to the same factory state it was in when you first installed it. time. There’s also an option to start over. Where the tool can delete every app, cache, container, preference, and keychain entry that Office may have created while it was running.
Office-Reset does not delete your documents and workbooks. The tool doesn’t contain ads, upsells, collect your data, or install software you don’t want. It just runs, fixes, and exits.
Editor’s recommended: How can I disable cache or shadowing from my Windows XP BIOS?